
Have you ever gone somewhere on a bike, a school bus, a train, or in a car? Your answer is most likely yes — you might even ride more than one of them every day. All of these vehicles have one important thing in common — wheels. Around for thousands of years, wheels make vehicles very good at traveling on flat surfaces like paved roads. Some all-terrain vehicles (like tanks or dirt bikes) are even designed to be driven off-road through fields, rocks, and dirt. But when it really comes down to it, legs are sometimes better for getting around. For example, you might be able to ride your bike through mud and gravel, but chances are you probably would not ride it completely off-trail in the middle of the woods, or up a flight of stairs (we know some professional bike riders do this — but it is difficult and very dangerous).
Many different types of robots use wheels, legs, or something in between. The NASA Curiosity rover uses large wheels to help it handle the rough Martian terrain. Back here on Earth, Boston Dynamics has developed robots that can walk on four legs like a dog or even two legs like a human. In between these two. we have robots like RHex from the University of Pennsylvania and Whegs™ from Case Western Reserve University. These robots use attachments that spin continuously in one direction (like wheels), but they are not circular — they have at least one distinct point that comes in contact with the ground, like a leg (you might have figured out by now that the "Whegs" robot takes its name after a combination of the words "wheel" and "leg"). This gives the robots some of the advantages of wheels, like good balance and speed on flat ground, along with some of the advantages of legs, like climbing stairs and traveling over rough ground.
In this project, you will use a LEGO® Mindstorms® kit to build the body of a basic robot car, along with a series of different attachments to replace the wheels. You will then test the performance of the different attachments in three different ways — their ability to climb "stairs" (made from a pile of textbooks), speed on flat ground (like a wooden floor), and speed on rough ground (through grass or gravel outdoors). You will use these tests to determine if some attachments work better than others in different situations.
The video shows you how the robot we built at Science Buddies handled climbing a staircase made of textbooks with different motor attachments. We will provide some basic directions for building a robot similar to this one in the Procedure section, but remember that this is an engineering design project — you do not have to follow our directions exactly. The size, shape, and nature of your robot and its attachments are up to you — limited only by your imagination (and the size of your LEGO collection)!
- All-terrain vehicle
- Robot
- Whegs
- Ground clearance
- Hexapod
- Range
- What do the Whegs and RHex robots have in common with a cockroach? How does this affect their balance?
- How well does the Big Dog robot from Boston Dynamics respond to being kicked or slipping on ice?
- Which robots seem to have the easiest time balancing: those with six legs, four, or two?
- Can you find other types of walking robots besides the ones shown in the Introduction? How do they move, and what are they used for?
- What types of attachments do you think you can build for your LEGO robot to replace the wheels?
- Which attachments do you think will be best at climbing stairs? Which will make the robot fastest on different surfaces?
- Do you think there will be an overall "best" attachment, or will different attachments be better in different situations?
Building Your Robot
Note: This project does not provide piece-by-piece directions for building a LEGO robot, like those that come with most LEGO kits. Instead, we provide suggestions for a basic "robot car" design. Depending on your LEGO-building skills and the size of your LEGO collection, you may wish to follow our suggestions, or design and build your own robot. It is up to you.
- First, start with the NXT brick (Figure 1).
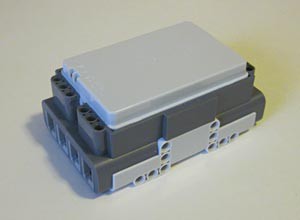
Figure 1. The main "body" of your robot — the NXT brick (we show it here upside down — this will make more sense as you build your robot).
- Add beams to the sides of your NXT brick; these will enable you to attach motors. One possible configuration is shown in Figure 2.
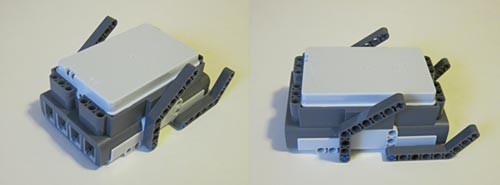
- You will probably need additional beams and some pegs to attach your motors. This is shown in Figure 3.
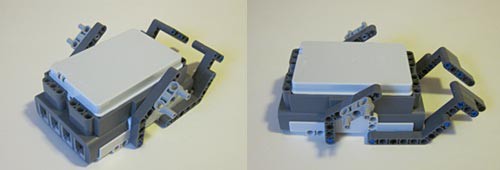
Figure 3. Additional pegs and beams are attached to the beams added in step 2, creating the attachment points for the front and rear motors.
- Attach the motors. By now you should have created a structure like the one in Figure 4 with beams and pegs that will enable you to attach the motors to the body of your robot. You need to make sure your motors are positioned so that your robot has enough ground clearance — you do not want the belly of the NXT brick dragging on the ground when your robot moves!
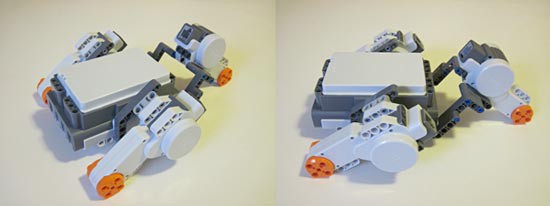
- Attach additional supports if necessary. Your motors might be kind of wobbly at this point — especially your left and right motors. If you have enough LEGOs left, you can add more supports to make your robot sturdier. Figure 5 shows an example of adding a crossbeam to connect the left and right motors, making their support connection stronger.
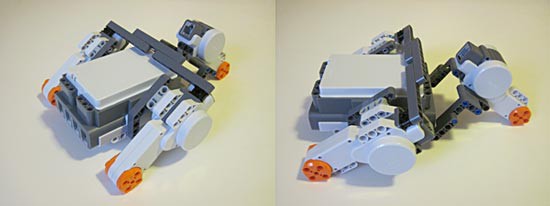
Figure 5. A crossbeam is added to connect the left and right motors, making them less wobbly. You can add more supports to your robot to make it sturdier if you have enough LEGO pieces.
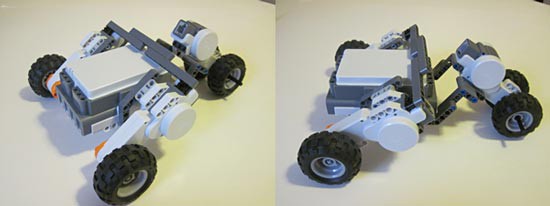
- Attach the wheels to your robot. The NXT kit comes with four wheels but only three motors — so notice how, in Figure 6, we have attached one wheel each to the "front" motors (on the left and right), and two wheels to the "rear" motor (which is centered). This makes sure that the robot will balance properly.
- Connect your three motors to ports A, B, and C on the NXT brick with the supplied cables, as shown in Figure 7.
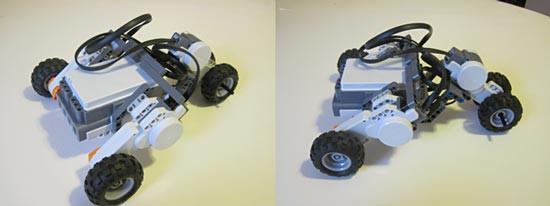
Figure 7. Use the NXT kit's cables to connect the motors to ports A, B, and C. Make sure the cables do not interfere with the rotation of the motors, and that they will not get caught on obstacles on the ground.
- Build different attachments to replace the wheels. Figure 8 shows the different attachments used in the video in the Introduction. Did you watch the videos of the Whegs and RHex robots? Can you design your own attachments based on these robots or your own background research? What other shapes do you think you can try?
Important: The plastic LEGO pieces tend to slip on hard surfaces like book covers and wood floors. This will put your attachments at a serious disadvantage against rubber wheels. So, we recommend using rubber bands (as shown in Figure 8) to add traction to your attachments and make it a fair comparison.
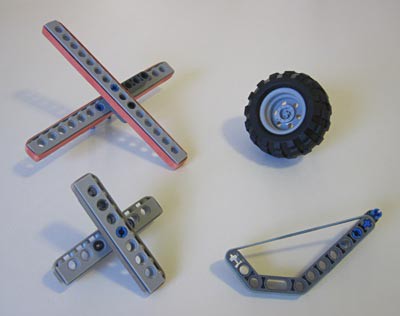
Figure 8. Various attachments (shown next to a wheel for size comparison) of different shapes and sizes that can be used to replace the wheels. Rubber bands have been added to the attachments to prevent the plastic LEGO pieces from slipping on hard surfaces.
Programming Your Robot
- Because all you need your robot to do is drive forward when you turn it on, programming for this project is luckily pretty simple. In the NXT-G software, you can use the "Move" block to tell motors to spin forward or in reverse for a certain amount of time (we recommend setting the time to "Unlimited," so your robot will just continue to run until you turn it off). You can use a single block to control motors A, B, and C individually, or any combination of the three. Figure 9 has two example programs using "Move" blocks.
- Depending on how you attached the motors to your robot, you might need all your motors to spin in the same direction, or in different directions. The best way to find out is to download a program to your robot and test it.
- Figure 9 shows two possible programs. In the program on the top, all three motors (ports A, B, and C) spin in the same direction. In the program on the bottom, the "front" motors (ports A and C) spin forward, but the "rear" motor (port B) spins backward. Again, whichever configuration you use will depend on how you attached the motors to your robot. If you download and run your program and all of your robot's wheels spin in the same direction and your whole robot moves forward, then you are good to go, If the wheels are spinning in opposite directions, or all spinning in the same direction but your robot moves backward, then you need to reverse the direction of rotation of one or more of your motors. Change your program, download it to your robot, and try again. Repeat this until your robot moves forward.
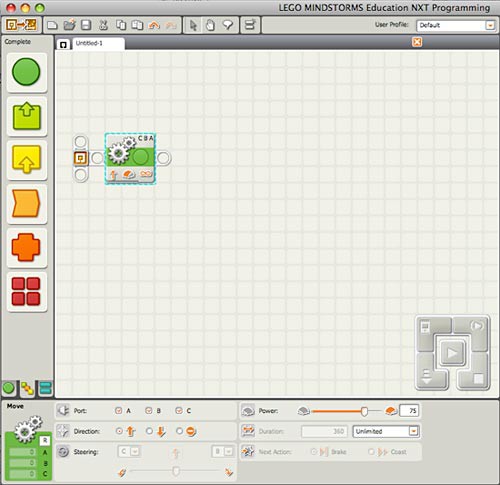
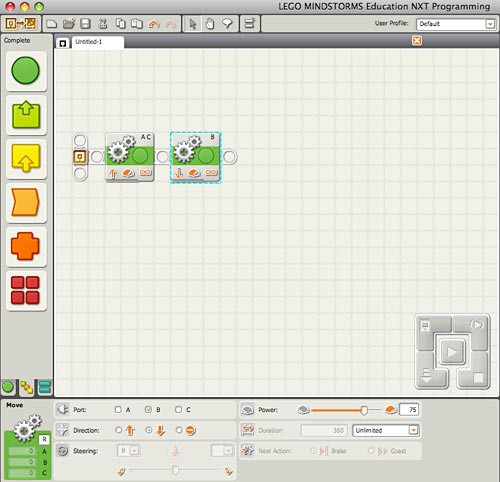
Figure 9. Two possible programs for your robot using NXT-G software. The program on top uses one block to make motors A, B, and C all spin forward for an "Unlimited" amount of time. The program on the bottom has motors A and C spin forward while motor B spins backward (again, for an "Unlimited" duration).
Testing Stair-climbing Ability
- Construct a staircase out of books, similar to the one shown in the video in the Introduction (a screenshot from this video is shown in Figure 10). Large, heavy books like textbooks or cookbooks will work better than small, light paperbacks. Make sure your staircase is wide enough for your robot so it does not fall off the edges (it might help to make your staircase two books wide).
- Test the ability of your robot to climb the staircase with the normal NXT wheels attached. Can it make it all the way up and over the staircase? Does it make it up a couple of steps and then get stuck? Can it not even make it up the first step? Do at least three trials to make sure your first test wasn't a fluke, and record these results in your lab notebook.
- Swap out the wheels for one of your other attachments, and repeat step 2. Repeat step 2 until you have tested all of your attachments, and be sure to write down the results for each attachment in your lab notebook.
- If you have time, make some adjustments to your staircase and retest the wheels and each one of your attachments. What happens if you make the staircase steeper or shallower? What if you make each step two books high instead of one? Does this change your results?

Testing Speed on Flat Ground
- Set up a straight path on flat ground (such as a carpet, or wood or tile floor) with no obstacles. Make sure there are clear starting and finish lines (you can mark these with tape or other objects). We recommend making your path at least 2 meters long (or about 6 feet).
- Using your stopwatch, time how long it takes the robot with wheels to make it from the starting line to the finish line. Do at least three trials to ensure that your data is accurate, and record these results in your lab notebook.
- Repeat step 2 for each one of your different attachments, and be sure to record your results in your lab notebook.
Testing Speed on Rough Ground
- Set up a straight path on rough ground outside, such as through grass, gravel, or dirt. Make sure there are clear starting and finish lines. Again, we recommend making your path at least 2 m (about 6 ft.) long. Warning: Your NXT is not waterproof! We do not recommend running your robot through mud or puddles.
- Using your stopwatch, time how long it takes the robot with wheels to make it from the starting line to the finish line. Do at least three trials to ensure that your data is accurate, and record these results in your lab notebook.
- Repeat step 2 for each of your different attachments, and be sure to record your results
Analyze Your Results
- You have now tested your robot's climbing ability, speed on flat ground, and speed on rough ground with wheels and several other attachments. Which attachment was the best at climbing stairs? Which was fastest on flat and rough terrain? Do you think there was an overall "best" attachment, or does the best attachment depend on the situation?
- To determine which attachment or wheel was best you will need to graph the data you collected. Make a bar chart showing the number of successful stair climbing trials for each attachment. Make scatter plots and bar graphs of the speed data for the attachments. For the scatter plots, add all the trials for each attachment so that you can see the range for your data. For the bar charts try graphing the average time for each attachment under each ground condition.
- Based on your results, if you could only pick one type of wheel or attachment to put on your all-terrain robot, which one would it be? Do you have to decide between trade-offs in performance, like sacrificing speed for climbing ability? This is the kind of decision that real design engineers have to make every day, with no guarantee that there will be a single "best" answer. Try creating a decision matrix to help you display the advantages and disadvantages of each attachment.